Headboard Improvement

I have a confession to make. I have never liked my guest room headboard.

Until now…

close up headboard at Dogs Don't Eat Pizza

Now I love it.

I lived with this wicker headboard for umpteen years.

headboard in guest room before at Dogs Don't Eat Pizza

I could live with the wicker, but I never really liked it. It was in the guest room, so I didn’t see it every day.

headboard before at Dogs Don't Eat Pizza

But when I was spring cleaning, I noticed that the wicker was only attached with screws and a plywood backing.

The wheels started turning…and before I knew it, I had removed the wicker insert.

wicker gone at Dogs Don't Eat Pizza

I had fabric that I knew would work for an upholstered headboard insert, so I just needed plywood, batting, and foam. Oh, and spray paint for the frame.

I went to Lowe’s for supplies and had the plywood cut to size.  *STOP THE STORY RIGHT HERE.*

If you learn nothing else from this post – although I hope you learn how to upholster a headboard, too, but if you learn nothing else – learn this: when you have a piece of wood cut at a hardware store, make sure you measure the cut piece before you leave the store. Make sure it’s actually cut to the right measurements.

plywood at Dogs Don't Eat Pizza

Because I watched the guy measure the wood and then cut it, and I just assumed he was accurate.

He wasn’t. He cut it an eighth of an inch too big. And that’s a lot when you need the plywood for an insert.

Unfortunately, I didn’t notice this until I had already upholstered the board and tried to fit it into the headboard. Oops.

I ended up sanding the board down the eighth of an inch I needed and it fit perfectly. Whew. Lesson learned.

OK, back to our upholstering story…

To upholster the board, I first cut foam to the size of the board (I got the foam and batting at a local fabric store). I took the board outside, sprayed it with spray adhesive, and attached the foam.

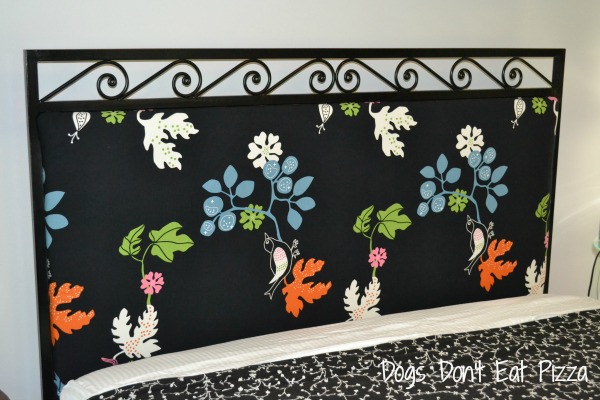
Then I brought it in and laid out the fabric and batting so that the fabric was positioned how I wanted it:

fabric placement

Then I wrapped the batting and fabric around the board, and, pulling it tight, stapled it in place with a staple gun.

upholstering headboard at Dogs Don't Eat Pizza

fixing the edge
Here you can see the layers: board, foam, batting, fabric.

To make the corners neat, fold them the way you would when gift-wrapping a present.

upholstering done at Dogs Don't Eat Pizza

And there it is.

For the frame, I spray painted it with Rustoleum Universal – Paint and Primer in One – in Satin Black.

spray painted headboard frame

Once the paint had dried completely, I attached the upholstered plywood to the frame with the original screws.

close up headboard at Dogs Don't Eat Pizza

finished headboard at Dogs Don't Eat Pizza

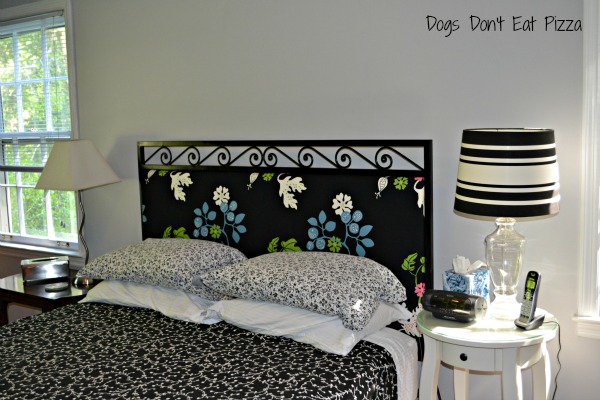
And now I love this headboard.

Thank you for stopping by!

blog signature


Linked to:

Home Stories A2Z
Worthing Court
The Humble Brag Link Party

23 responses to “Headboard Improvement”

  1. nova c. Avatar
    nova c.

    the headboard has so much personality now!!! love the fabric you used to redo it!

    Like

    1. Karen Cooper Avatar
      Karen Cooper

      Thanks, Nova!

      Like

  2. Holly Avatar

    awesome update! I love the change and that you took something that looked a little dated and made it fresh and new… way to use what you’ve got.

    Like

    1. Karen Cooper Avatar
      Karen Cooper

      Thanks, Holly!

      Like

  3. Marty Walden Avatar

    You did a great job, Karen. I’m learning to fall in love with fabric! It just adds a unique splash of color to the room!

    Thanks for linking up to Home{work} Wednesday for our first party! Hope you entered our giveaway as well!

    Like

    1. Karen Cooper Avatar
      Karen Cooper

      Thank you! I did! Thank you for hosting the party and the giveaway!

      Like

  4. Cindy Eikenberg Avatar

    Karen, this looks fabulous….love it!!! The fabric is beautiful and you did a wonderful job. Thanks for sharing and am pinning! Have a great weekend!

    Like

    1. Karen Cooper Avatar
      Karen Cooper

      Thanks, Cindy!

      Like

  5. Erin @ DIY on the Cheap Avatar

    Looks great, Karen! Love the fabric you chose.

    Like

    1. Karen Cooper Avatar
      Karen Cooper

      Thanks, Erin!

      Like

  6. Allyson Avatar

    Wow, such a night and day difference!! Great job!

    Like

    1. Karen Cooper Avatar
      Karen Cooper

      Thanks, Allyson!

      Like

  7. Jill@Weathered Pieces Avatar

    What a great idea! Thanks for sharing!

    Like

    1. Karen Cooper Avatar
      Karen Cooper

      Thanks, Jill!

      Like

  8. Jae Avatar

    Love using what you already have!

    Like

    1. Karen Cooper Avatar
      Karen Cooper

      Thanks, Jae! I always prefer to “shop my home” first before buying something.

      Like

  9. Niki Avatar

    I liked it before too…but this is really cool. I never would have realized you could to that! Love it!

    Like

    1. Karen Cooper Avatar
      Karen Cooper

      Thanks, Niki! The good thing is that, if I ever want to change it back, I can just reinsert the old part. Or, I can change the fabric. I love that it’s versatile and changeable!

      Like

  10. Julie Avatar

    ILOVE THE FABRIC CHOICE KAREN!! (I’m screaming that incase you wondered why its in caps 🙂

    Like

    1. Karen Cooper Avatar
      Karen Cooper

      Woot! Thank you, Red.

      Like

  11. Claire @ A Little Claireification Avatar

    Wow what a transformation!! You did a great job – it looks fantastic!
    xoxo

    Like

    1. Karen Cooper Avatar
      Karen Cooper

      Thank you!

      Like

  12. SheilaG @ Plum Doodles Avatar

    Karen, your headboard looks wonderful! The fabric looks great with the striped lamp shade, and the bedding, too!

    Like

Leave a reply to Niki Cancel reply

I’m Karen

I’m a recovering lawyer. Join me on my DIY and organizing adventures!